
Table of contents:
Digimagaz.com – video editing has become an essential part of our daily lives. With the rise of social media platforms, everyone wants to create high-quality and engaging videos to share with their friends and followers.
This is where a powerful video editing app like Kinemaster comes in. It is a versatile and user-friendly tool that allows you to create and edit professional-grade videos on your mobile device. In this article, we will walk you through the process of using Kinemaster and help you unleash your creativity.
What is Kinemaster?
Kinemaster is a powerful, easy-to-use video editing app designed for mobile devices. Available for both Android and iOS, it offers a wide range of features and tools, making it a popular choice among content creators, vloggers, and anyone looking to create high-quality videos.
With Kinemaster, you can edit videos, add visual effects, and even add music and sound effects. Additionally, it allows you to export videos in various formats and share them on social media platforms.
Getting Started with Kinemaster
Download and Install the App
To use Kinemaster, you first need to download the app from the Google Play Store or the App Store. Simply search for Kinemaster and click on the install button.
Once downloaded, open the app and click on “Create a new project.” You will then be prompted to choose the aspect ratio of your video — 16:9 (landscape), 9:16 (vertical), or 1:1 (square). Once you have selected the aspect ratio, you will be directed to the main editing screen.
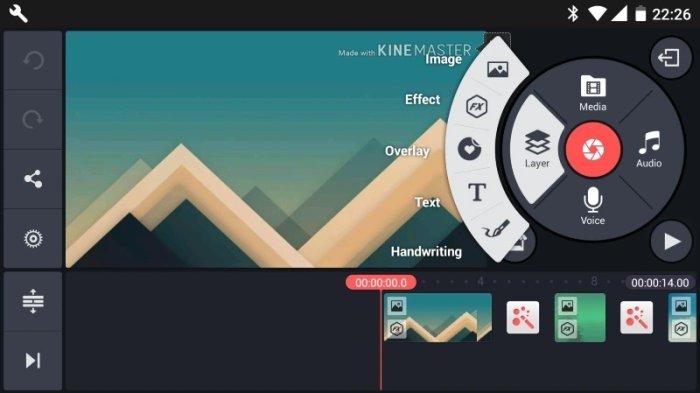
The Interface
The Kinemaster interface is user-friendly and straightforward, making it easy to navigate and use. Let’s take a brief look at the various elements of the interface:
- Media Browser: This is where you can access all your media files, including videos, photos, and music.
- Timeline: The timeline is where all the editing magic happens. This is where you can arrange and trim your clips, add transitions, and apply effects.
- Preview Screen: Here, you can preview your video before exporting it.
- Layers: The layers panel allows you to add multiple layers to your project. You can add text, stickers, or even multiple videos to create a more dynamic video.
- Tools: The tools panel contains various editing tools such as trim, split, crop, and more.
Editing Your Video
Now that you are familiar with the interface, let’s dive into the editing process:
1. Import Your Video Footage
Open the Kinemaster app and select “New Project.” Then, tap on the “+” button to import your videos, photos, and audio files from your device’s gallery. You can also record new videos directly through the app.
2. Trim and Split Clips
Kinemaster allows you to trim or cut your video clips to remove any unwanted parts. Simply select the clip on the timeline, and you will see handles at the beginning and end of the clip. Drag the handles to trim the clip or use the “Split” tool to divide the clip into two parts.
3. Add Transitions
To add transitions between two clips, click on “Layer” and select “Transition.” Choose the transition you want to use and drag it onto the timeline between the two clips. You can adjust the duration of the transition by dragging the edge of the clip.
4. Apply Effects and Filters
Kinemaster offers various effects and filters to enhance your videos. To apply an effect, click on the clip on the timeline and select “Effect.” Choose the effect you want to apply, and it will be added to your clip. These effects can help enhance the colors, add special effects, and give your video a professional touch.
5. Add Text and Overlays
To add text or stickers, click on “Layer” and select either “Text” or “Sticker.” You can then customize the text or sticker by changing the font, color, size, and more. This is a great way to add captions, titles, or logos to your video to make it more engaging and informative.
6. Use the Audio Mixer
The audio mixer feature in Kinemaster allows you to adjust the volume of your video and different audio tracks. This is helpful when adding background music or voiceovers to your video. Click on “Audio” and select “Music” or “Sound” to choose from the app’s library or import from your device.
Exporting Your Video
Once you are satisfied with your video, click on the export button and choose the desired video quality. You can also add a watermark or a custom thumbnail before exporting your video. Click on the “>” icon on the top right corner of the screen and select “Export.” You can choose the format and quality of your video and add a title and description. Finally, click on “Export” to save your video to your device.
Common Issues and Solutions
- App Crashing: Clear the cache, close any other apps running in the background, and update the app to the latest version.
- Audio Out of Sync: Use the voiceover recording feature to adjust the timing of the audio.
- Poor Video Quality: Make sure that your device has enough storage, and try exporting your video in a lower resolution or using a different format.
Using Kinemaster for Specific Purposes
Creating YouTube Videos
Use the keyframe animation feature to add intro/outro animations and the voiceover feature to narrate your videos.
Editing Instagram Videos
Utilize the text, stickers, and filters to make your videos more engaging and shareable.
Making TikTok Videos
Use the speed control and transitions to create dynamic and trendy videos.
Upgrading to Kinemaster Premium
While the free version of Kinemaster is sufficient for most users, the premium version offers additional features such as no watermark, more filters and effects, and access to the asset store. You can upgrade to the premium version by purchasing a subscription.
Tips for Creating Engaging Videos with Kinemaster
- Start with a Plan: Before you start editing, have a clear idea of what you want to achieve with your video.
- Keep It Simple: Don’t overload your video with too many effects and transitions. Keep it simple and let the content speak for itself.
- Use High-Quality Footage: Make sure the videos and photos you use are of high quality for a professional-looking video.
- Add Music: Music adds emotion and depth to your video. Choose music that complements the tone and mood of your video.
- Experiment with Effects: Don’t be afraid to experiment with different effects and transitions to add a unique touch to your video.
Conclusion
In conclusion, Kinemaster is a powerful and user-friendly tool that allows you to create high-quality videos on your mobile device. With its numerous features and tools, you can unleash your creativity and produce engaging and professional-looking videos. So, download Kinemaster today and start creating masterpieces!
FAQs
Is Kinemaster compatible with all Android devices?
Yes, Kinemaster is compatible with most Android devices, but some older or lower-end devices may not have the necessary processing power to run the app smoothly.
Can I use Kinemaster for free?
Yes, Kinemaster offers a free version with limited features and a watermark on exported videos. You can upgrade to the premium version for access to all features and to remove the watermark.
Can I import media from cloud storage services?
Yes, you can import media from Google Drive, Dropbox, and other cloud storage services by linking your account to Kinemaster.
Can I collaborate on a project with others using Kinemaster?
Yes, Kinemaster allows for multi-user collaboration on a project, making it easy to work with a team or get feedback from others on your video edit.